In order for an IT consultancy to maximize maintenance plans, consultants must first learn how to properly administer these agreements. Erik Eckel offers advice about billing from lessons he has learned.
Maintenance plans are a consultant’s best bet for smoothing the turbulence that accompanies most IT support roles. By minimizing downtime, maintenance and support contracts help IT consultants develop more predictable schedules, generate more consistent revenue, and eliminate many unplanned outages, which quickly tire and exhaust even well-staffed consultancies. Maintenance plans offer another important benefit: These plans help ensure proper data backup operations are in place and are working as required.
Smart organizations work to protect their data from catastrophic loss due to fire and other threats. In Louisville, KY, where my IT consultancy resides, tornadoes are another worry. But how often do such scenarios prove realistic? Well, take a lesson from my IT consultancy. In the last 11 months, my office has had to assist clients in recovering from an unforeseen hurricane (yes, such things exist), a devastating ice storm, and events of the last week.
Last Tuesday, August 4, 2009, began like any other day. A breakfast meeting with a strategic partner was followed by a new desktop deployment and data migration. Then emergency calls started rolling in around 10:00 AM. Clients all over town were taking on water, literally. High water, even in locales usually immune from flash flooding, resulted in millions of dollars in damage. Such is the effect of more than six inches of rain within an hour.
This situation is a good example of why I advocate selling maintenance plans. These support contracts are an excellent method of not only smoothing your consultancy’s business operations but also protecting clients from the loss of critical data. But, before an IT consultancy can maximize maintenance plans, consultants must first learn how to properly administer them. After three-and-a-half years of consulting full time, I’ve learned a few lessons. Here are three tips for billing maintenance plans:
1. Describe services
When performing maintenance tasks — such as monitoring server disk space or e-mail logs, reviewing antivirus scans and back up routines, and downloading and installing security patches and performance updates — be sure to tell clients which tasks you complete; this is especially true if you perform these services remotely.
Don’t just send an invoice that lists “server maintenance” and don’t just describe services as “reviewed backup logs” or “server maintenance” on the invoice. Instead, state “confirmed server back up operations were backing up critical data off-site as scheduled” or “downloaded and installed Microsoft-recommended server security and performance patches to protect against newly identified threats and known performance issues.” By including additional information, you better enable the client to understand exactly how you continue to add value to their business.
2. Write tight maintenance agreements
Clients don’t always differentiate between maintenance work and new projects. If you draft an agreement that specifies you’ll provide support service, be sure to define the tasks that constitute maintenance and support. Some clients may believe migrating data from an old server to a new Windows domain constitutes maintenance, while most consultants will view such a complex and time-consuming task as a new project.
Better yet, when drafting maintenance and support plans, specify the number of IT service hours the client receives each month. If the client surprises you with a new project, then it’s not a problem. You should include language in the maintenance contract that clearly states the hourly rate the client will pay for any IT services delivered above and beyond the number of hours they receive each month as part of the maintenance or service plan. This strategy helps eliminate any unpleasant surprises when the client receives your bill.
3. Leverage reporting features and tools
Windows Small Business Server includes daily performance reporting features. Third-party tools, including GFI Software’s HoundDog and HyBlue’s Windows Monitor, offer alternative monitoring opportunities. Even APC power management software and image backup applications offer automated and alert reporting. Be sure to use these types of tools to keep an eye on your client’s servers and computers. Review appropriate performance reports daily to help identify troublesome trends and errors before the issues become crises. Then, be sure to include the time spent on such tasks on your monthly maintenance plan invoice.
Three tips for billing maintenance plans
Three tips for selling maintenance plans to clients
Maintenance plans may be the best investment an organization can make when trying to protect against data loss and unscheduled outages and downtime. Erik Eckel shares how his consulting firm sells clients on the idea of maintenance plans.
Clients need service and support contracts, but many don’t want to pay the price. Likely the best investment any small business can make to help ensure productivity, efficiency, and uninterrupted business operations, some organizations resist critical maintenance and monitoring tasks.
This always amazes me. Clients sometimes find it difficult to justify paying $X to prevent possible downtime, yet when critical PCs, servers, or network equipment fails, they don’t hesitate to get you out of bed on a weekend to pay $5X to repair a failure.
As true partners, it’s your responsibility to help business owners understand the need for and the business value of service and support contracts. Here are three tips for selling maintenance plans.
1. Document service plan benefits
Even if a business hasn’t expressed interest in becoming a service or support contract client, draw up a maintenance plan agreement and personally deliver it to the business owner the next time you complete a project on-site. Take a minute to review bullet points that tout the plan’s benefits.
My consulting firm’s contracts typically provide all the following benefits:
* Priority service response, meaning the client receives emergency assistance quickly when crises arise.
* No industry-standard call-out fees (often listed at $35 or more to cover technician travel time and/or fuel costs).
* Four or more pre-paid service hours each month.
* Daily monitoring of servers and critical systems and equipment to provide proactive protection from failures, errors, and other business disruptions.
* Discounted rates for other work.
* Discounted rates for employees’ personal systems.
Having a document handy that lists the benefits of proactive monitoring and prevention, as well as other benefits to the business, helps reinforce the value owners receive when entering such a contract. Keep these documents short but descriptive; my firms’ contracts run just two pages, including space for contact information and signatures.
2. Audit service history
If you still encounter resistance closing a maintenance contract after providing a client with a sample service and support contract, take some time to review their service history. If the client has been calling your IT consultancy for emergency repair or break/fix work over the course of a year or more, annualize the total costs and then divide by 12; the total is usually more than the average monthly maintenance plan subscription. Point that out (tactfully) to the client.
When regular clients resisted signing a maintenance agreement, I reviewed their invoice history over the past year. Most of the time, those clients would have saved money by subscribing to a maintenance plan that would have helped prevent failures (such as when server data partitions consume all available free space, email databases exceed maximum limits, etc.). On those occasions when proactive maintenance wouldn’t have lowered the bill (e.g., hardware loss due to lightning strikes, end-of-life-cycle performance issues, or other trouble), I note how much the client would have saved by avoiding call-out fees and enjoying better service rates. Such calculations often remove any remaining objections.
3. Review unscheduled downtime costs
If preparing a sample contract and reviewing service history (and associated expenses) doesn’t convince a client of the benefits of a service and maintenance plan, be sure to review the costs of lost data and unscheduled downtime.
In 2008, CompTIA reported that spyware infections typically require 2.5 days to resolve. Worse, the costs from resulting downtime are excessive. CompTIA’s statistics indicated small and medium size business workers lose 18 work hours before reporting spyware, and total costs are listed at $8,000 — and this total doesn’t even factor lost revenue! (Spyware infections can be prevented via preventive maintenance.)
A 2001 Ontrack report, Cost of Downtime Survey Results, found that U.S. businesses lose on average $12 billion a year due to data loss. Maintenance plans should place a premium on not only ensuring solid backup routines are in place, but also on monitoring daily backups to ensure the backups complete properly and that all critical business data is safely stored off-site. Worse, according to the National Archives & Records Administration, 93 percent of companies that lose data center access for more than 10 days file for bankruptcy within one year.
While I don’t advocate using scare tactics to convince a client of the importance of technology maintenance and service plans, these are real statistics. All hard drives fail — it’s just a question of when. RAM chips can prove faulty. Motherboards and disk controllers develop inconsistencies. Power supplies flake out.
Conclusion
Don’t minimize the importance of signed maintenance contracts. In addition to helping ensure your clients’ business operations run more smoothly and their data are properly secured and protected, by signing clients to a formal maintenance plan, you help solidify your standing as that client’s IT provider. At the same time, you can minimize unscheduled break/fix work and spend more time performing preventive maintenance, thereby helping smooth your own business’ operations.
While you can’t prevent failures and errors, you can serve as a valuable business partner to your client and help identify and mitigate known risks. Helping clients understand the importance of maintenance plans is an important first step in becoming such a partner.
USB flash drive - 10 cool tips
| INFOMATION |
| Your USB flash drive can do a whole lot more than just move data around. Greg Shultz introduces a variety of creative ways to put that drive to good use. |
Transporting your data is probably the most common use for a USB flash drive. But there’s a world of other things you can do with these handy pocket-size drives. Here are 10 ways you can use that USB flash drive to do more than just move data.
1. Run portable applications
In addition to storing your data, you can run portable applications from a USB flash drive. For example, OpenOffice, which is a complete office suite that includes a word processor, spreadsheet, presentation tool, drawing package, and database, is available as a portable application. Mozilla Firefox and Thunderbird are also available as portable applications. When you combine the office suite with the ability to surf the Web and check email, you’ll be able to take your most vital computing applications with you wherever you go — right in your pocket.
If that’s not enough, you can choose other applications to install on your USB flash drive from PortableApps.com (Figure A). You can even install an entire prepackaged suite of applications that includes such things as an audio player, games, an antivirus utility, and a handy menu system.
Figure A
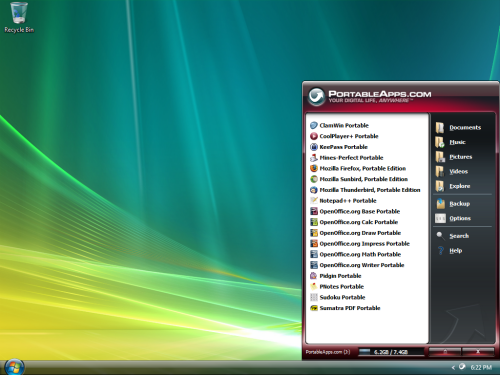
The PortableApps.com suite comes with a menu system to allow you to easily access your portable applications.
2. Boot an operating system
If you want to do more than just run your own applications, you might want to consider booting an entire operating system from your USB flash drive. You can boot either Windows or Linux from a USB flash drive; however, the process is not an exact science and you may be in for a technical adventure.
Fortunately, there are some guides you can follow. To learn how to boot Windows XP from a USB flash drive, see the article Creating a bootable USB flash drive for Windows XP. To learn how to boot a version of Linux from a USB flash drive, see the article Puppy Linux teaches an old dog new tricks.
3. Connect to a wireless network
If you have a wireless network, you can use the Wireless Network Setup Wizard in Windows XP or the Windows Connect Now (WCN) feature built into Vista to save wireless network configuration information to a USB flash drive. You can then use your drive to quickly and easily connect another computer or a WCN-compatible device, such as a router or printer, to your wireless network. To learn more about using the Wireless Network Setup Wizard, see the Help And Support Center, which is accessible from Windows XP’s Start menu. To learn more about using the Windows Connect Now feature, see Windows Help And Support, which is accessible from Windows Vista’s Start menu.
4: Create a password reset disk
A password reset disk can really come in handy if you forget the password to your user account on a Windows system that is not a part of a domain. If you find yourself in that situation, you can use the password reset disk to reset your password and quickly get back into your user account. In Windows Vista, you can use USB flash drive rather than a floppy disk as a password reset disk (Figure B). For details on how to do so, see the article Create a Vista password reset disk using a USB flash drive.
Figure B

You can use your USB flash drive as a password reset disk.
5. Boost performance
If you’re running Windows Vista, you can use a USB flash drive to speed up your system with the ReadyBoost technology. ReadyBoost can use the storage space on a USB Flash drive as an additional memory cache to aid the memory cache on your hard disk. And because flash memory is more responsive than a hard disk, with its physical moving parts, the memory cache provided by ReadyBoost can significantly improve system responsiveness.
Using ReadyBoost is easy. You just insert your USB flash drive into your Vista system and follow the onscreen prompts to configure and use ReadyBoost. If you want more details, check out the article How SuperFetch and ReadyBoost work together.
6. Manage it
If all you really want to do with your USB flash drive is transport data, and you’re running Windows XP, you can do so more efficiently with the Microsoft USB Flash Drive Manager (Figure C). Once you have installed this manager, you can easily copy files to and from your drive, back up and restore the entire flash drive to and from your hard disk, change the drive label, and even create an autorun.inf file to launch Drive Manager automatically when you plug in the drive. To learn more about and download the USB Flash Drive Manager visit the Microsoft TechNet Magazine site.
Figure C
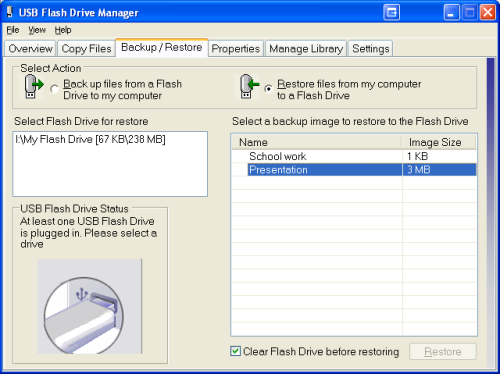
The Microsoft USB Flash Drive Manager provides you with a host of features, such as drive backup.
7. Use it as an MP3 player
Would you like to be listening to music when you’re using a computer at the office, but you don’t have an MP3 player? If so, you can use a USB flash drive as an MP3 player along with Windows Media Player and a set of headphones. Just copy your MP3 files to your USB flash drive, plug it into your computer, and direct Windows Media Player to build a library of the songs on your drive. You can use all of Windows Media Player’s playback features, such as playlists and favorites, to easily customize your music listening experience. And best of all, you won’t have to worry about running low on battery power.
8. Password-protect it
If you use a USB flash drive to transport sensitive data that you would prefer to protect from prying eyes, should you lose the drive, Rohos Mini Drive (Figure D) can safeguard that data. This security tool allows you to create a secret partition on the drive and then password-protect/encrypt that partition, thus protecting any documents you copy to that partition via the utility’s file manager. You can download (and read a review of) Rohos Mini Drive at Download.com.
Figure D
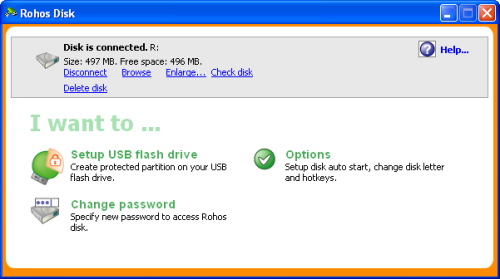
Using Rohos Mini Drive, you can secure sensitive files on your USB flash drive.
9. Run a Web site from it
If you are a Web developer, you may be interested to know that with Server2Go, you can easily run a Web server that supports Apache, PHP, MySQL, and Perl right from a USB flash drive. You can use Server2Go right out of the box without any installation. It runs on all versions of Windows, supports most common browsers, and is completely free. To a developer, the benefits of having a portable Web server on a USB drive are numerous. For example, imagine being able to carry a live Web site demo into a sales pitch meeting. For more information about this package, visit the Server2Go site.
10. Lock your PC
Have you ever seen a movie in which a person in some secret government installation simply inserts and removes a card to log in and log out of a PC? If you thought that idea was cool, you’ll definitely want to investigate Predator (Figure E). Once installed and configured, this little freeware utility will allow you to turn a USB flash drive into a key you can use to lock and unlock your computer.
Figure E
With Predator, you can use a USB flash drive as a key to lock and unlock your computer.
While the USB flash drive is connected to your computer, everything works as it normally would. Once you remove the USB flash drive, your computer is locked down — the keyboard and mouse are disabled and the screen darkens. To unlock your computer, you just plug in the USB flash drive and the computer will be unlocked and you can begin using it. To learn more about Predator, and/or to download it, visit the developer’s Web site.
iPad Can Play 720p HD Movies with Pristine Quality?
Can iPad play 720p videos? With its maximum screen resolution is 1024x768 pixels, 720p video can be really played on iPad and maintained with its native resolution? We know that the iPad's screen isn't HD. It's not even in a 16:9 aspect ratio. To play 720p video at 720p, we need a screen that supports a 1280 x 720 resolution (921,600 pixels). But the iPad just has a 1024 x 768 resolution (786,432 pixels) with the old-school television 4:3 ratio. So I have always had doubts about the truth of playing 720p HD videos on iPad.

April 5, 2010-the first day I got my iPad, I could not wait to unpack it and load my prepared 720p (1280 * 720 * 30p video, H.264 encoding, bitrate to achieve about 4M) trailer for "Iron Man 2" to my iPad…Whoa. Absolutely gorgeous. Watching movies on the plane will never be the same again. The 720p video could be perfectly played on my iPad.
In order to make the best use of its larger, high-resolution screen for movie enjoyment, I tried to put some complete HD movies like Avatar, Twilight, or Harry Potter Series, etc which in 1080p or 1080i MKV, M2TS, or WMV format from my computer to iPad. First I converted these high quality 1080p or 1080i MKV, M2TS videos to iPad workable format HD MP4 (h.264, AAC encoded) and preset the best output video/audio parameters with an excellent HD Video Converter, after conversion, I imported these converted MP4 videos to my iPad and enjoyed with my family. Wow, it was amazing; we had sat through the entire movies without a hitch, the image quality is exactly good with 720p effect.
Until now, I'm pleased with my iPad, for its convenience, its wide/gorgeous screen, its long battery life, its fast speed, and its 720p content support.
12 Quick Tips To Search Google Like An Expert
If you’re like me, you probably use Google many times a day. But, chances are, unless you are a technology geek, you probably still use Google in its simplest form. If your current use of Google is limited to typing a few words in, and changing your query until you find what you’re looking for, then I’m here to tell you that there’s a better way – and it’s not hard to learn. On the other hand, if you are a technology geek, and can use Google like the best of them already, then I suggest you bookmark this article of Google search tips. You’ll then have the tips on hand when you are ready to pull your hair out in frustration when watching a neophyte repeatedly type in basic queries in a desperate attempt to find something.
The following Google search tips are based on my own experience and things that I actually find useful. The list is by no means comprehensive. But, I assure you that by learning and using the 12 tips below, you’ll rank up there with the best of the Google experts out there. I’ve kept the descriptions of the search tips intentionally terse as you’re likely to grasp most of these simply by looking at the example from Google anyways.
12 Expert Google Search Tips
- Explicit Phrase:
Lets say you are looking for content about internet marketing. Instead of just typing internet marketing into the Google search box, you will likely be better off searching explicitly for the phrase. To do this, simply enclose the search phrase within double quotes.Example: "internet marketing"
- Exclude Words:
Lets say you want to search for content about internet marketing, but you want to exclude any results that contain the term advertising. To do this, simply use the "-" sign in front of the word you want to exclude.Example Search: internet marketing -advertising
- Site Specific Search:
Often, you want to search a specific website for content that matches a certain phrase. Even if the site doesn’t support a built-in search feature, you can use Google to search the site for your term. Simply use the "site:somesite.com" modifier.Example: "internet marketing" site:www.smallbusinesshub.com
- Similar Words and Synonyms:
Let’s say you are want to include a word in your search, but want to include results that contain similar words or synonyms. To do this, use the "~" in front of the word.Example: "internet marketing" ~professional
- Specific Document Types:
If you’re looking to find results that are of a specific type, you can use the modifier "filetype:". For example, you might want to find only PowerPoint presentations related to internet marketing.Example: "internet marketing" filetype:ppt
- This OR That:
By default, when you do a search, Google will include all the terms specified in the search. If you are looking for any one of one or more terms to match, then you can use the OR operator. (Note: The OR has to be capitalized).Example: internet marketing OR advertising
- Phone Listing:
Let’s say someone calls you on your mobile number and you don’t know how it is. If all you have is a phone number, you can look it up on Google using the phonebook feature.Example: phonebook:617-555-1212 (note: the provided number does not work – you’ll have to use a real number to get any results).
- Area Code Lookup:
If all you need to do is to look-up the area code for a phone number, just enter the 3-digit area code and Google will tell you where it’s from.Example: 617
- Numeric Ranges:
This is a rarely used, but highly useful tip. Let’s say you want to find results that contain any of a range of numbers. You can do this by using the X..Y modifier (in case this is hard to read, what’s between the X and Y are two periods. This type of search is useful for years (as shown below), prices or anywhere where you want to provide a series of numbers.Example: president 1940..1950
- Stock (Ticker Symbol):
Just enter a valid ticker symbol as your search term and Google will give you the current financials and a quick thumb-nail chart for the stock.Example: GOOG
- Calculator:
The next time you need to do a quick calculation, instead of bringing up the Calculator applet, you can just type your expression in to Google.Example: 48512 * 1.02
- Word Definitions:
If you need to quickly look up the definition of a word or phrase, simply use the "define:" command.Example: define:plethora
Hope this list of Google search tips proves useful in your future Google searches. If there are any of your favorite Google expert power tips that I’ve missed, please feel free to share them in the comments.
Keyboard shortcuts for the Visual Basic Editor
The Visual Basic Editor (VBE) is the development environment in the MS Office applications. Fortunately, there are a number of keyboard shortcuts that you can use to work more efficiently while entering, viewing, and editing code.
General
Alt + F11 This toggles switch displays the VBE from the application window and vice versa.
Ctrl + G Displays Immediate window.
Ctrl + F Opens the Find dialog box.
F3 Find Next.
Shift + F3 Find Previous.
Ctrl + H Opens the Replace dialog box.
Ctrl + Z Cancels the last keyboard stroke or the last mouse operation (when possible.)
F5 Runs the current procedure or continues execution after pausing.
Ctrl + Break Halts a procedure.
Shift + F5 Terminates a procedure and resets all variables to their default values.
Shift + F10 Displays the active window’s shortcut menu.
Ctrl + R Opens the Project Explorer.
F4 Opens the Properties window.
F2 Opens the Object Browser. F1 Opens VBA Help.
F7 Gives focus to the open module window.
Code module
Ctrl + Down Arrow Select next procedure.
Ctrl + Up Arrow Select previous procedure.
Ctrl + Page Down Shift one screen down.
Ctrl + Page Up Shift one screen up.
Ctrl + Shift + F2 Go to last position.
Ctrl + Home Go to beginning of module. (Also in the Immediate window.)
Ctrl + End Go to end of module. (Also in the Immediate window.)
Ctrl + Right Arrow Move one word to the right.
Ctrl + Left Arrow Move one word to the left.
End Move to the end of the line.
Home Move to the beginning of the line.
Ctrl + Y Delete current line.
Ctrl + Delete Delete to end of word.
Ctrl + Shift + F9 Clear all breakpoints.
Project Explorer
F7
Shift + Enter Open the selected file’s module.
Home Select the first file in the list.
End Select the last file in the list.
Right arrow Expands a sublist.
Left arrow Collapses a sublist.
Up arrow Moves up the list one item at a time.
Down arrow Moves down the list one item at a time.
10 reasons why Windows 7's XP Mode is a big deal
Windows 7 features a new twist: XP Mode, which lets you run your Windows XP apps without compatibility issues. Someone explains why XP Mode is significant and outlines its benefits.
One of the most exciting Windows 7 features is Windows XP Mode. It uses a brand new version of Virtual PC to provide seamless access to Windows XP applications, either through a virtual Windows XP desktop or directly through the Windows 7 desktop. Here’s a look at some of the benefits XP Mode offers.
1. It solves compatibility problems
The biggest beef that most IT folks seem to have with Windows Vista is its notorious hardware and software compatibility problems. Windows 7’s Windows XP mode allows you to run Windows XP applications without worrying about application compatibility.
2. It provides a much needed upgrade to Virtual PC
Virtual PC has been around for a long time, and although it has improved from one version to the next, it still leaves a lot to be desired. Among the improvements in the new version is the ability to access the computer’s physical hard drives (including the host operating system’s volumes) through a virtual machine.
3. It offers USB Support
Another much needed improvement to Virtual PC (which Windows XP Mode depends on) is that it now offers USB support. It has previously been impossible to access USB devices from within a virtual machine.
4. It’s a way to modernize Windows XP
I know that there are those who would disagree with me, but Windows XP hasn’t aged well. First introduced in 2001, Windows XP is quickly becoming outdated. Windows XP Mode provides enables you to run Windows XP inside a modern operating system, which helps it take advantage of some of the improvements that have been made to things like hardware support and security. Windows XP itself hasn’t changed, but because Windows XP Mode is dependent on the host operating system, it can reap some of these benefits.
5. It ensures long-term technical support
Microsoft’s continued support for Windows XP has been questionable for quite some time now. Every time Microsoft gets ready to pull the plug on main stream technical support, they give in to pressure from customers and extend the support period. It’s great that Microsoft has been so accommodating, but nobody knows how long that will last. Having Windows XP Mode built into Windows 7 helps ensure that Windows XP support will be available for many years to come.
6. Microsoft has made a commitment to XP
For the last several years, Microsoft has urged customers to adopt Windows Vista, but most of Microsoft’s corporate customers have chosen to continue using Windows XP. By including Windows XP mode in Windows 7, Microsoft has finally acknowledged the importance of Windows XP to its customers and given diehard XP fans a real solution that will allow them to move forward without giving up the OS they’ve depended on for almost a decade.
7. It offers seamless integration
One of my favorite things about Windows XP Mode is that it’s completely seamless. Sure, you can work within a full-blown Windows XP virtual machine, but you don’t have to. In fact, if you close the Windows XP virtual machine, you can access your Windows XP applications directly through the Windows 7 start menu and run those applications seamlessly alongside applications that are installed directly on Windows 7.
8. It’s a first
This is the first time Microsoft has ever given us this type of support for an older product. Exchange 2000 included a copy of Exchange 5.5, but that was only included as part of the migration path for Exchange 5.0 users. Microsoft wasn’t expecting customers to actually use both products. Making Windows XP part of the Windows 7 operating system is unprecedented.
9. It opens the door to lightweight operating systems
Windows has always had a bad reputation for being excessively bloated. One of the reasons for the bloat is that most versions of Windows have included a significant amount of code to provide backward compatibility with the previous version. By relying on virtualization to provide this compatibility, Microsoft may be able to greatly reduce the size of the core operating system in Windows 8.
10. Future plug-ins are possible
The way Microsoft has connected Windows XP to Windows 7 through virtualization opens the door to future operating system plug-ins. Don’t be surprised if Windows 8 gives you the ability to pick and choose the legacy operating systems you want to support. Microsoft could end up offering virtualization plug-ins that will allow it to support Windows XP, Vista, and Windows 7. Using this method would allow customers to pick the type of backward compatibility they need without having to install any unnecessary legacy code.
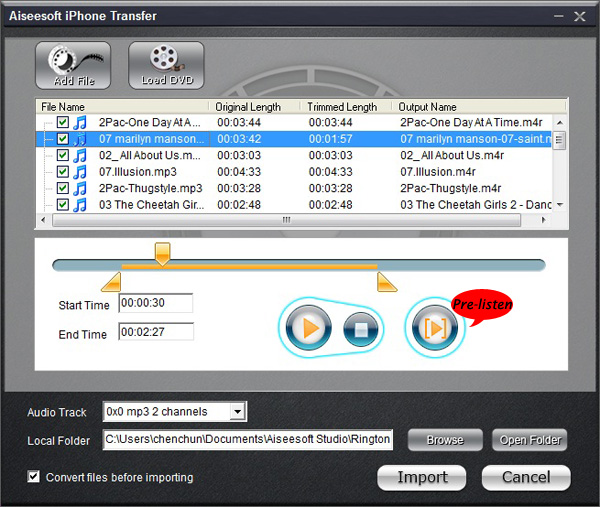
How to Import DVD Movies/Videos/Songs/Images to iPhone
Step 1: Connect iPhone
Plug your iPhone to your computer via USB cable, it can automatically find your iPhone, load your iPhone info and show the info at the left of its interface. (It works the same as itunes.)
Step 2: Import to iPhone
A. Import DVD movies to iPhone (iTunes does not allow you to do this)
1.Select “Movie” in the left list and then click “PC to iPhone” button at the bottom of the interface, you will see a conversion and import window.
2.Put your DVD movies in your DVD Drive and Click “Load DVD” button to load the movies.
3.You can choose “Audio track” and “Subtitles” of the output movies, if you do not want a subtitle just leave it blank. You need also select the output profile and you can select apply to all button to use this output profile forever, if you do not use it some day, you can change it at will.
4.Click “Import” button and it will help you to convert the movies to iPhone video format and then import into your iPhone directly.
Note:
You need to check the box before “convert files before importing”, if not the movies/videos/songs can not be recognized by iPhone and can not be played in iPhone.
B. Import videos/songs to iPhone (iTunes only import certain format videos/songs to iPhone)
1. Select “Video” or “Music” in the left list and then click “PC to iPhone” button and go to the conversion and import window
2. Click “Add File” button to add the video or music to it and you can choose output profile and then click “import” button
Note:
If the videos and songs' format is not supported by iPhone, this powerful iPhone transfer will convert them first and then transfer them into your iPhone. If you have lots of videos or songs it may take longer to transfer them to your iPhone.
C. Import photo/images to iPhone
The process of importing images to iPhone is the same as videos/songs. First you need to select photo in the left list. Second you can select photos to import to your iPhone.
Note:
If you import a photo you do not want to you iPhone, you can right click the selected photo and then delete it from iPhone directly.
D. Import and Create Ringotnes to iPhone (iTunes can only import but not create)
1.Select Ringtone on the left list
2.Click “PC to iPhone” button and you will go to the make ringtone and import window.
3.Here this powerful iPhone transfer allows you to create ringtones for iPhone from DVD/Movie/Video/Music.
4.After you load a video, music or a DVD, you can pick up one part of it as your ringtone. You can pre-listen the ringtone. If not satisfied, change it and re-prelisten it.
5.After you find your right part as your ringtone, click “import” button. It will generate your ringtone and then import to your iPhone directly.
Four tips for a killer PowerPoint presentation
| INFOMATION |
| Have you ever been tempted to chew off a paw to escape a mind-numbing slide show? Bad design and flawed delivery may have been to blame. BNET’s Dave Johnson offers a few simple suggestions to help presenters avoid some of the worst pitfalls |
I hate PowerPoint presentations. Let me clarify; I don’t hate PowerPoint. I actually like the program quite a bit. But most of the PowerPoint presentations I am forced to sit through seem to combine all the world’s worst presentation habits into one unbearable hour of pain, sadness, and cheesy fonts. Here are four things I’ve learned from years of delivering PowerPoint presentations.
1. Choose a simple PowerPoint template and apply it consistently across your deck
Honestly, I’m not even sure how people manage to do this, but I routinely see presentations with a ransom note assortment of fonts, sizes, and styles on each slide. PowerPoint goes out of its way to make it easy to apply a consistent style; take advantage of it. In PowerPoint 2007, for example, click the Design tab and choose one of the themes. And keep it simple; make sure the text is readable against the background and that there isn’t a busy design competing with the text. Remember what Halle Berry told me once in a dream: Just because a theme exists, doesn’t mean you should use it.
2. Less is more
Don’t feel the need to pour your entire speech into your slides. As a rule of thumb, each slide should list three to five main points in bullet form. You’re in the room to expand on those nuggets verbally. The slides are there to enhance your overall presentation, not to replace you. If it takes more than a few seconds to process the text on any given slide, it’s too much: Your audience will spend its time reading instead of paying attention to you, and probably end up doing both of those things somewhat poorly.
3. Test your links
If you embed video or links to content on the Internet or a network share, for the love of Woden test it before you walk into a conference room and try presenting it to a dozen people. I can’t tell you how frequently I encounter folks who don’t know how to launch an external link from within their deck or who have linked to an obsolete version of the document they wanted to show. Do you homework.
4. Test your projection
Along the lines of testing the innards of your presentation, be sure you know how your laptop connects to the projector. As a rule of thumb, make sure the laptop is fully booted and then connect the VGA cable. If you’re on Vista, you should then choose Win+X to open the Windows Mobility Center and click Connect Display. (If you’re testing Windows 7, it’s even easier: Press Win+P to open the projection settings directly.)
11 ways to avoid drawing layer headaches in Word
| INFOMATION |
| Word offers some decent drawing tools, but they don’t always give you the results you expect. Someone unravels some of Word’s drawing layer mysteries. |
Adding pictures and objects to a Word document can enhance your message. For instance, what’s a brochure or pamphlet without a few pictures? Word’s drawing tools aren’t as powerful as a desktop publishing package, but they’re adequate for many tasks. However, the drawing tools aren’t second nature to most users. Learning a few easy tricks will help you work more efficiently with Word’s drawing features.
1. Rethink the drawing layer
You must adjust the way you think about the drawing layer: The document and drawing layers are two separate layers.
Most documents are two-dimensional, like a flat sheet of paper — we call that the document layer. That’s fine as long as you’re just dealing with text. The drawing layer is an additional layer that floats above or below the document layer. Objects in the drawing layer don’t interact with the contents in the document layer because you can’t actually draw inside the document layer.
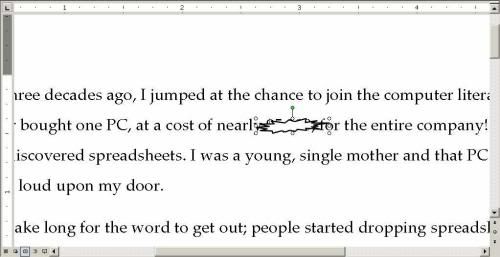
Imagine trying to insert a starburst to emphasize the high price of an early PC, as shown in Figure A. Unfortunately, you can’t do it. Word adds the starburst to the drawing layer, which floats on top of the document layer by default. To make matters worse, the picture can even disappear. Choose Normal from the View menu, and you can’t even see the starburst. Word’s drawing layer isn’t visible in Normal view, so you might forget it’s even there.
Figure A
The drawing layer floats above or below the document layer.
2. Pictures aren’t always equal
You can’t draw in the document layer. However, you can insert a picture into the document layer using the Insert menu. When you do, Word treats the picture like another big text character. In other words, the picture is in-line with the text and other content. That means that Word will push the picture around as if it were text. If you select a line or paragraph that contains a picture, you also select the picture. While this can be convenient, it’s also limiting. For instance, you can’t drag the picture to a new position or change its orientation.
Inside the drawing layer, however, Word treats a picture like any other object in the drawing layer. That means you can do more with the picture, such as changing its orientation and dragging to a new location.
More often than not, you’ll want pictures in the drawing layer. Getting a picture into the drawing layer takes a little work. First, you insert the picture as you normally would:
- Position the cursor approximately where you want the picture to be. (You can easily move pictures in the drawing layer, so don’t obsess over placement.)
- Choose Picture from the Insert menu and the choose From File (or Clip Art).
- Locate the picture (or clip art) and click Insert.
Figure B

By default, pictures start out in the document layer.
To move a picture from the document layer to the drawing layer, do the following:
- Right-click the picture.
- Choose Format Picture.
- Click Layout.
- Choose a wrapping style.
- Click OK.
Figure C

Move pictures to the drawing layer.
3. Change the layer default
By default, Word inserts all pictures in-line with text. If you want all of your pictures in the drawing layer, change Word’s default insertion method, as follows:
- From the Tools menu, choose Options.
- Click the Edit tab.
- Choose one of the many options from the Insert/Paste Pictures As control, as shown in Figure D. Select the wrapping style you’ll use most often.
- Click OK.
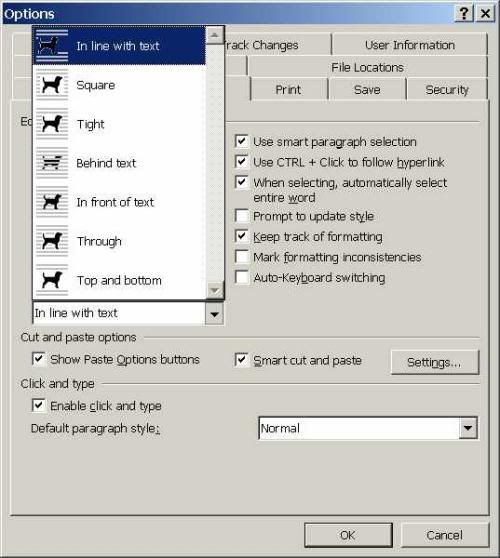
Choosing a wrapping style from these options will force new pictures into the drawing layer.
After changing this setting, Word will insert all pictures into the drawing layer instead of in-line with text.
4. Display anchors
The drawing layer anchors a picture to a paragraph. That way, the picture moves with its corresponding text. Now, that might work great, but it can also be a real nuisance. Knowing a picture is anchored to a paragraph before you move the paragraph can prevent a lot of confusion. Although it seems odd, Word doesn’t display anchors by default, so change that setting if you plan to work with pictures. To see anchors while you work, do the following:
- Choose Options from the Tools menu.
- Click the View menu.
- Check the Object Anchors option in the Print And Web Layout Options section.
Figure E
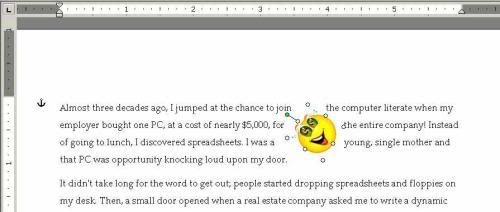
Display anchors to avoid annoying mistakes when moving text that contains pictures.
5. Control anchors
When you add a picture to the drawing layer, Word anchors the picture to the text nearest the picture — you can’t really control Word’s initial choice. However, you can change the anchor. Simply drag the anchor to another paragraph.
Once you have the anchor where you want it, it’s a good idea to lock it in place as follows:
- Right-click the picture.
- Choose Format Picture.
- Click the Layout tab.
- Click the Advanced button.
- Select the Lock Anchor option in the Options section.
- Click OK.
- Right-click the picture.
- Choose Format Picture.
- Click the Layout tab.
- Click the Advanced button.
- Select the Picture Position tab.
- Select Absolute Position in the Horizontal section and choose Page from the To The Right Of control.
- Select Absolute Position in the Vertical section and choose Page from the Below control.
- Click OK twice.
There may be times when you don’t want a picture to be anchored. In that case, do the following:
- Right-click the picture.
- Choose Format Picture.
- Click the Layout tab.
- Click the Advanced button (bottom right).
- Click the Picture Position tab.
- Deselect the Move Object With Text check box in the Options section.
- Click OK twice.
Sometimes, in-line with text really is the best format for a picture. If the picture’s in the drawing layer, you can quickly return it to in-line with text as follows:
- Right-click the picture.
- Choose Format Picture.
- Click the Layout tab.
- Select In Line With Text.
- Click OK.
Once a picture is in the drawing layer, you have several options for determining how text in the document layer wraps around a picture. Explanations for those options follow:
- In Line With Text: Word positions the picture in line with the text. The picture flows with the text; text doesn’t wrap around the picture.
- Square: Text wraps around the picture in a rectangle.
- Tight: Word uses wrapping points to determine the amount of space between the text and the picture.
- Behind Text: Word displays the picture behind the text; text doesn’t wrap.
- In Front Of Text: Word displays the picture in front of the text; text doesn’t wrap.
8. Override the snap-to grid feature
When you move a picture in the drawing layer, Word micromanages things a bit. There’s an invisible grid that Word uses to snap pictures into place. It’s a way of lining things up, which you might not need or want. It can be frustrating if you want to move a picture just a tad one way or the other because the grid won’t let you.
To override the snap-to grid feature, hold down the [Alt] key while you move the picture. This will allow you to move a picture just a hair, something the snap-to-grid feature won’t let you do. Using just the keyboard, you can hold down the [Ctrl] key and press the arrow keys.
9. Text in the drawing layer isn’t really text
It’s okay to add text via a text box or some other drawing object. In fact, sometimes it’s exactly the right technique for the job. However, keep in mind that Word doesn’t treat text in the drawing layer the same way it treats text in the document layer. Specifically, Word won’t consider text in the drawing layer when generating a table of contents, table of figures, or any other reference table. It simply isn’t text to Word; text in the drawing layer is a drawing object.
10. Change AutoShape defaults
Word’s Drawing toolbar offers a number of drawing objects, such as lines, arrows, rectangles, ovals, text boxes, and AutoShapes. All of these objects come with default attributes. Their initial size, color, and so on, are all determined by these defaults. Usually, you’ll change one or more default attributes. Maybe you’ll change an arrow’s begin style or make the arrowhead larger. Perhaps you’ll turn a solid line into a line of dashes. There are many possibilities.
The thing to remember is this: If most of your objects share the same attribute, you can change the object’s defaults. That way, you won’t have to change the attribute for each new object. Create the first object and when it’s just the way you want it, change the object’s defaults as follows:
- Right-click the object.
- Choose Set AutoShape Defaults.
11. Turn off the drawing canvas
The drawing canvas escapes definition — it’s like a piece of drawing layer with attitude. It’s difficult to work with, obscures the view of your document, and serves almost no purpose, perhaps other than to annoy you.
If you try to add drawing objects to a document and the drawing canvas pops up, as shown in Figure F, you can disable it. First, cancel what you’re doing. Then, turn off the drawing canvas and try again. (By default, the canvas is turned off — thank goodness — but if it shows up, you’ll know how to deal with it.
Figure F
Disable the drawing canvas.
To turn off the drawing canvas, do the following:
- From the Tools menu, choose Options.
- Click the General tab.
- Uncheck Automatically Create Drawing Canvas When Inserting AutoShapes in the General Options section.
- Click OK.