Some useful tips for how to convert video to avi on mac os?

Want to convert videos to AVI file with Leawo Mac AVI converter to enjoy your colorful digital life? Now here comes the step-by-step tutorial to show you how to use this Leawo Mac AVI converter. Before this user guide, please download and install Leawo Mac AVI Converter first!

Step 1: Do the essential settings
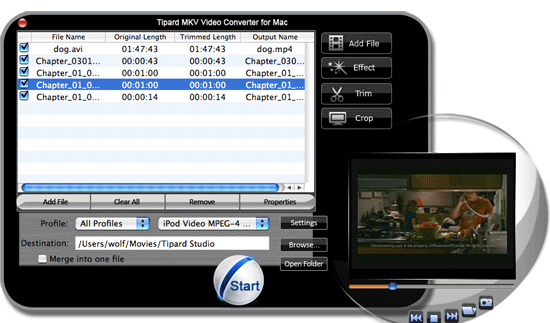
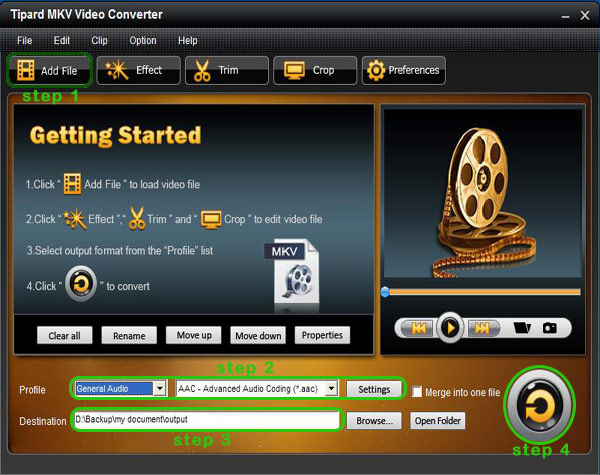
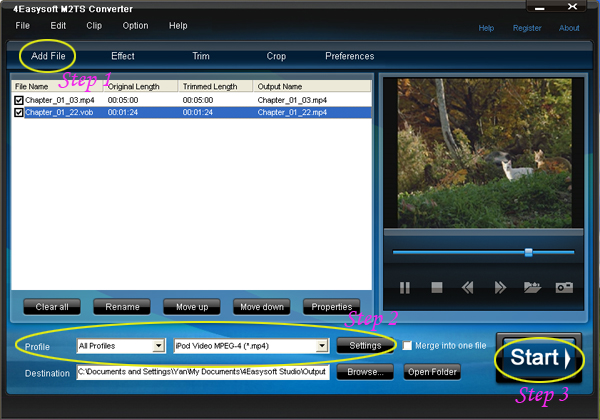
Click "Add" button to load video files you want to convert.
Select each file and choose the output format in "Profile".
Select video and audio quality that you need.
Set an output folder by "Output" for the destination files.


Step 2: Video Effect Settings
Click Edit button button to crop, adjust and watermark video to satisfy your needs.
Crop: Click "Crop" button to crop the video file to extract the black sides or unnecessary segment from the original video file.


Trim: Click "Trim" button. Now trim video duration by setting start time and end time to keep the segment you want.
Effect: Click "Effect" button to set video brightness, contrast, and saturation for better output quality.
Watermark: Check "Enable Watermark", and click "Image Watermark" or "Text Watermark" to add watermark to the video, then adjust the Transparency, Margin, and Watermark Size.


Step 3: Attached Video Settings
1. Click "Options" button to adjust the image, if necessary.
There are two buttons for you to adjust the image according to your need. One is "General" button, the other is "Thumbnail" button.
2. Click "Settings" button to set audio and video parameters:
Video: Set video encoding settings by selecting a video codec, a frame rate, a bit rate and a video size, etc.
Audio: Set audio encoding settings by selecting an audio codec, sample rate, an audio channel, a bit rate, etc.


3. Merge file:
If you want to join several files into one, just select the checkbox Merge video and convert into one AVI file on Mac on the main interface, and then you will join videos on Mac or Windows and only get one output file instead of multiple files.

Step 4: Convert Videos
When you have got ready for the settings for the added videos in the video converter program, you can click start mac video to avi conversion button to start conversion. Just for a while, the conversion would finish and be enjoyed freely.

Download Leawo AVI Converter for Mac Now!

The 10 most useful Linux commands

Maybe the command line isn’t your favorite place to hang out, but to be an effective Linux admin, you need to be able to wield a few essential commands. Jack Wallen says these 10 are guaranteed to simplify your Linux admin life — and he explains why.


I understand that many of you don’t want to use the command line in Linux (or in any operating system, for that matter). But the truth is, to be a good administrator, you have to know the command line. Why? Well, with Windows there are times when the command line is the only thing that can save your skin. With Linux, the command line is vast, reliable, flexible, fast… I could go on and on.
And of the 2,119 possible commands from the /usr/bin directory (in Mandriva Spring 2008) and the 388 possible commands from /usr/sbin/, a few are indispensable. Here are 10 of them that might make your Linux admin life — or your introduction to Linux — a whole lot simpler.
I could make this easy and go with the most used commands (cd, ls, rm, etc — okay, etc isn’t a command, but you get the point). But instead, I am going to go with the most useful commands, and I’ll keep it as distribution-neutral as I can.

#1: top
I figured it was fitting to put the top command at the top. Although top is actually responsible for listing currently running tasks, it is also the first command Linux users turn to when they need to know what is using their memory (or even how much memory a system has). I often leave the top tool running on my desktop so I can keep track of what is going on at all times. Sometimes, I will even open up a terminal (usually aterm), place the window where I want it, and then hide the border of the window. Without a border, the terminal can’t be moved, so I always have quick access to the information I need.
Top is a real-time reporting system, so as a process changes, it will immediately be reflected in the terminal window. Top does have some helpful arguments (such as the -p argument, which will have top monitor only user-specified PIDs), but running default, top will give you all the information you need on running tasks.

#2: ln
To many administrators, links are an invaluable tool that not only make users lives simpler but also drastically reduce disk space usage. If you are unaware of how links can help you, let me pose this simple scenario: You have a number of users who have to access a large directory (filled with large files) on a drive throughout the day. The users are all on the same system, and you don’t want to have to copy the entire directory to each user’s ~/ directory. Instead, just create a link in each user’s ~/ directory to the target. You won’t consume space, and the users will have quick access. Of course when spanning drives, you will have to use symlinks. Another outstanding use for links is linking various directories to the Apache doc root directory. Not only can this save space, it’s often advantageous from a security standpoint.

#3: tar/zip/gzip
Tar, zip, and gzip are archival/compression tools that make your administrator life far easier. I bundle these together because the tools can handle similar tasks yet do so with distinct differences (just not different enough to warrant their own entry in this article). Without these tools, installing from source would be less than easy. Without tar/zip/gzip, creating backups would require more space than you might often have.
One of the least used (but often most handy) features of these tools is the ability to extract single files from an archive. Now zip and gzip handle this more easily than tar. With tar, to extract a single file, you have to know the exact size of the file to be extracted. One area where tar/zip/gzip make administration simple is in creating shells scripts that automate a backup process. All three tools can be used with shell scripts and are, hands down, the best, most reliable backup tools you will find.

#4: nano, vi, emacs
I wasn’t about to place just one text editor here, for fear of stoking the fires of the “vi vs. emacs” war. To top that off, I figured it was best to throw my favorite editor — nano — into the mix. Many people would argue that these aren’t so much commands as they are full-blown applications. But all these tools are used within the command line, so I call them “commands.” Without a good text editor, administering a Linux machine can become problematic.
Imagine having to attempt to edit /etc/fstab or /etc/samba/smb.conf with OpenOffice. Some might say this shouldn’t be a problem, but OpenOffice tends to add hidden end-of-line characters to text files, which can really fubar a configuration file. For the editing of configuration or bash files, the only way to go is with an editor such as nano, vi, or emacs.

#5: grep
Many people overlook this amazingly useful tool. Grep prints lines that match a user-specified pattern. Say, for instance, that you are looking at an httpd.conf file that’s more than 1,000 lines long, and you are searching for the “AccessFileName .htaccess” entry. You could comb through that file only to come across the entry at line 429, or you can issue the command grep -n “AccessFileName .htaccess” /etc/httpd/conf/http.conf. Upon issuing this command you will be returned “439:AccessFileName .htaccess” which tells you the entry you are looking for is on, surprise of all surprises, line 439.
The grep command is also useful for piping other commands to. An example of this is using grep with the ps command (which takes a snapshot of current running processes.) Suppose you want to know the PID of the currently crashed Firefox browser. You could issue ps aux and search through the entire output for the Firefox entry. Or you could issue the command ps aux|grep firefox,at which point you might see something like this:

jlwallen 17475 0.0 0.1 3604 1180 ? Ss 10:54 0:00 /bin/sh /home/jwallen/firefox/firefoxjlwallen 17478 0.0 0.1 3660 1276 ? S 10:54 0:00 /bin/sh /home/jlwallen/firefox/run-mozilla.sh /home/jlwallen/firefox/firefox-bin

jlwallen 17484 11.0 10.7 227504 97104 ? Sl 10:54 11:50 /home/jlwallenfirefox/firefox-bin

jlwallen 17987 0.0 0.0 3112 736 pts/0 R+ 12:42 0:00 grep --color firefox
Now you know the PIDs of every Firefox command running.

#6: chmod
Permissions anyone? Linux administration and security would be a tough job without the help of chmod. Imagine not being able to make a shell script executable with chmod u+x filename. Of course it’s not just about making a file executable. Many Web tools require certain permissions before they will even install. To this end, the command chmod -R 666 DIRECTORY/ is one very misused command. Many new users, when faced with permissions issues trying to install an application, will jump immediately to 666 instead of figuring out exactly what permissions a directory or folder should have.
Even though this tool is critical for administration, it should be studied before jumping in blindly. Make sure you understand the ins and outs of chmod before using it at will. Remember w=write, r=read, and x=execute. Also remember UGO or User, Group, and Other. UGO is a simple way to remember which permissions belong to whom. So permission rw- rw- rw- means User, Group, and Other all have read and write permissions. It is always best to keep Other highly restricted in their permissions.

#7: dmesg
Call me old-school if you want, but any time I plug a device into a Linux machine, the first thing I do is run the dmesg command. This command displays the messages from the kernel buffer. So, yeah, this is an important one. There is a lot of information to be garnered from the dmesg command. You can find out system architecture, gpu, network device, kernel boot options used, RAM totals, etc.
A nice trick is to pipe dmesg to tail to watch any message that comes to dmesg. To do this, issue the command dmesg | tail -f and the last few lines of dmesg will remain in your terminal. Every time a new entry arrives it will be at the bottom of the “tail.” Keep this window open when doing heavy duty system administration or debugging a system.

#8: kill/killall
One of the greatest benefits of Linux is its stability. But that stability doesn’t always apply to applications outside the kernel. Some applications can actually lock up. And when they do, you want to be able to get rid of them. The quickest way to get rid of locked up applications is with the kill/killall command. The difference between the two commands is that kill requires the PID (process ID number) and killall requires only the executable name.
Let’s say Firefox has locked up. To kill it with the kill command you would first need to locate the PID using the command ps aux|grep firefox command. Once you got the PID, you would issue kill PID (Where PID is the actual PID number). If you didn’t want to go through finding out the PID, you could issue the command killall firefox (although in some instances it will require killall firefox-bin). Of course, kill/killall do not apply (nor should apply) to daemons like Apache, Samba, etc.

#9: man
How many times have you seen “RTFM”? Many would say that acronym stands for “Read the Fine* Manual” (*This word is open for variation not suitable for publication.) In my opinion, it stands for “Read the Fine Manpage.” Manpages are there for a reason — to help you understand how to use a command. Manpages are generally written with the same format, so once you gain an understanding of the format, you will be able to read (and understand) them all. And don’t underestimate the value of the manpage. Even if you can’t completely grasp the information given, you can always scroll down to find out what each command argument does. And the best part of using manpages is that when someone says “RTFM” you can say I have “RTFMd.”

#10: mount/umount
Without these two commands, using removable media or adding external drives wouldn’t happen. The mount/umount command is used to mount a drive (often labeled like /dev/sda) to a directory in the Linux file structure. Both mount and umount take advantage of the /etc/fstab file, which makes using mount/umount much easier. For instance, if there is an entry in the /etc/fstab file for /dev/sda1 that maps it to /data, that drive can be mounted with the command mount /data. Typically mount/umount must have root privileges (unless fstab has an entry allowing standard users to mount and unmount the device). You can also issue the mount command without arguments and you will see all drives that are currently mounted and where they’re mapped to (as well as the type of file system and the permissions).

Can’t live without ‘em
These 10 Linux commands make Linux administration possible. There are other helpful commands, as well as commands that are used a lot more often than these. But the commands outlined here fall into the necessity category. I don’t know about you, but I don’t go a day without using at least half of them. Do you have a Linux command or two that you can’t live without? If so, let us know.

Use tabs to open multiple files in vim

Editing multiple files at once is made easier in the vim text editor with the use of tabs. Vincent Danen goes over the basic tab commands and shows you how to combine them with key bindings to make the most of a powerful editing tool.

Most people use a text editor to edit one file at a time. If more than one file needs to be edited at once, a GUI user can have multiple windows or tabs open with the files, but someone on the command-line will usually swap between different consoles or terminal windows. With vim, you can use tabs also, just like you would in gvim or any other GUI editor.
You can open files in multiple tabs in two ways. The first is to execute vim with each file specified:

$ vim -p file1.txt file2.txt file3.txt


This will open three tabs, each containing the specified file. The second way to open files is to create new tabs within vim and open files using :tabnew file.txt in command mode, which opens a new tab and edits the specified file (if you omit the filename, you will get a new empty document).
To close a tab, use :tabc. To switch to the next tab, use :tabn, and to switch to the previous tab, use :tabp (short for tabnext and tabprevious respectively). You can also jump over tabs by using :tabn 2, which will move to the second next tab. To jump to the first tab, use :tabr:tabl (tablast). Finally, :tabs will give you a list of open tabs. (tabrewind) and to jump to the last tab use
Each tab is a separate editing instance, which means that buffers are not shared between tabs. This also means that you can have multiple windows, or view ports, open in each tab (i.e., one file to edit on the top half of the screen, another file in the bottom half). For instance, if you have multiple tabs open and in one of them want to refer to vim’s help system (i.e., :help tabs), you will have all of your tabs open, and in the foremost tab a split-screen editing view.
Using the various :tab* movement commands will still work, and using the [Ctrl]+W key bindings to manipulate windows (such as [Ctrl]+W then the down or up arrow to move between windows), will also work. Between tabs and windows, a single vim window can suddenly conveniently handle a large number of files at once.
Finally, to close a tab, close the file in it using :q or :wq if you need to save changes first.
Throw in some key bindings, and using tabs becomes even more convenient. For instance:

map :tabr

map :tabl

map :tabp

map :tabn

Adding the above to ~/.vimrc provides for a very convenient way to move between tabs. When in insert mode, press [Esc] to get to command mode, then use [Ctrl]+T plus a directional arrow to go to the tab you want: up to go to the first tab, down to the last, and left or right to go to the previous or next tab.
Using tabs is a great way to edit multiple text files in vim, without having to swap between terminals or consoles. Combining tab and window views, with some nice key bindings, makes it a simple, powerful, and very usable tool.

Copy iPhone SMS to TXT file with Tansee iPhone Transfer SMS

With Tansee iPhone Transfer SMS, you can backup iPhone SMS to PC as a txt file and keep them safe.

Guide of how to copy iPhone SMS to TXT file with iPhone SMS Backup software:

Step 1: Free Download Tansee iPhone Transfer SMS free trial version then install the software (skip if done yet). And please install iTunes version above 7.7, if your iTunes can read your iPhone, our software will.

Step 2: Connect iPhone to your computer.

Step 3: Launch Tansee iPhone Transfer SMS, the SMS contacts info will display as shown in your iPhone screen automatically as fig 1. Click on single contact, all SMS records from him/she will display as fig 2 shown.


Fig 1


Fig 2

Step 4-a: In fig 1 situation, you can click button "Copy" to copy sms from all iPhone contact, then select options:
1: Choose File Type: back up to TXT file or ANTS file;
2: Choose File Path: where to store the backup file, do nothing if you choose default path;
3: Advanced Option: if you choose ANTS format in step 1, you can add a password to protect the file.
Click OK Button to finish the Copy. See fig 3.
Note: You can only copy the first 20 items for each contact in trail version.


Fig 3

Step 4-b: In fig 2 situation, click button "Copy" to copy sms from a single contact, select options:
1: Choose File Type: You can select TXT file format in single contact sms transfer;
2: Choose File Type: You can select .MHT file format in single contact sms transfer; This format support Print Out.
Please open the .mht file by IE, click "tools" - "internet options" - "advanced" - check "print background colors and images", then click "Print".
3: Choose File Path: where to store the backup file, do nothing if you choose default path;
Click OK Button to finish the Copy. See fig 4.
Note: You can only copy the first 20 items for him/she in trail version.


Fig 4


Free download it and try!

Best MKV Converter Reviews

What is MKV format?
MKV (.MKV) is a new video and audio container format similar to AVI, but with several new features like support for OGG audio, Variable Framerate Video. Matroska (MKV) is an open standards project. This means for personal use it is absolutely free to use and that the technical specifications describing the bitstream are open to everybody, even to companies that would like to support it in their products. The most common use of .MKV files is to store HD video files.

To sum up, MKV file is an envelope for which there can be many audio, video and subtitles screams, allowing the user to store a complete movie with subtitles or CD in a single file.

Although most standalone players now support the AVI format, thus far MKV support is still rare. So for most players you need convert the MKV format to the common formats.
Here I’d like to introduce four wonderful MKV converters.

No.1 Tipard MKV Video Converter for Mac

It can convert MKV to AVI, MP4, WMV, HD videos as well as other popular video formats on Mac like HD H.264, HD AVI, HD MPG, HD TS, HD WMV and MOV, etc, or get MP3, WAV, WMA, AAC or M4A music file from MKV, MPG, WMV, MP4, AVI files with a few steps.


This MKV video converter for Mac also has powerful editing functions such as effecting, trimming, cropping, snapshot and merging files into one.


No. 2 Tipard MKV Video Converter

It can easily convert MKV to AVI, MPG, MP4, 3GP, HD videos, etc and extract audio from MKV and other videos to AAC, AC3, AIFF,AMR, AU, MP3, M4A, MP2, OGG, WMA, WAV etc for your iPod, iPhone, Zune, PSP, PS3, Xbox and other MP4 Player.


Its editing functions are effecting, trimming, cropping, snapshot and merging files into one.


No. 3 Aiseesoft MKV Converter
It can help you convert MKV, MPG, WMV, MP4, and AVI to the proper formats playable on iPod, iPhone, Zune, PSP, and other MP4 Player etc. It is really outstanding MKV Converter.

No. 4 Aimersoft MKV Converter
It is designed to help you perfectly convert MKV files to all various popular videos Such as AVI, MP4, WMV, MOV, FLV, ASF etc. It also supports HD AVI, HD MP4, HD WMV, HD MOV, HD ASF as output formats.

No. 5 4Easysoft MKV Converter
It is quite useful software to convert MKV files to MP4, AVI, 3GP, FLV, Divx, MP3, M4A, WMA etc. This MKV file Converter is designed to convert MKV files to the video and audio supported by most media players like iPod, iPhone, PSP, Archos, BlackBerry. So you can convert MKV files to YouTube, QuickTime and share with more friends in the world.

If you need mkv converter, any one is OK.

Convert 3GP to general video for Mac?

Want to convert videos to 3GP file with Leawo Mac 3GP converter to enjoy your colorful digital life? Now here comes the step-by-step tutorial to show you how to use this Leawo Mac 3GP converter. Before this user guide, please download and install Leawo Mac 3GP Converter first!

Step 1: Do the essential settings
Click "Add " button to load video files you want to convert.
Select each file and choose the output format in "Profile".
Select video and audio quality that you need.
Set an output folder by "Output" for the destination files.


Step 2: Video Effect Settings
Click Edit button button to crop, adjust and watermark video to satisfy your needs.


Crop: Click "Crop" button to crop the video file to extract the black sides or unnecessary segment from the original video file.
Trim: Click "Trim" button. Now trim video duration by setting start time and end time to keep the segment you want.
Effect: Click "Effect" button to set video brightness, contrast, and saturation for better output quality.
Watermark: Check "Enable Watermark", and click "Image Watermark" or "Text Watermark" to add watermark to the video, then adjust the Transparency, Margin, and Watermark Size.

Step 3: Attached Video Settings
1. Click "Options" button to adjust the image, if necessary.
There are two buttons for you to adjust the image according to your need. One is "General" button, the other is "Thumbnail" button.
2. Click "Settings" button to set audio and video parameters:
Video: Set video encoding settings by selecting a video codec, a frame rate, a bit rate and a video size, etc.
Audio: Set audio encoding settings by selecting an audio codec, sample rate, an audio channel, a bit rate, etc.


3. Merge file:
If you want to join several files into one, just select the checkbox merge multiple video to 3gp on Mac on the main interface, and then you will join videos on Mac or Windows and only get one output file instead of multiple files.

Step 4: Convert Videos
When you have got ready for the settings for the added videos in the video converter program, you can click start converting video to 3GP or 3G2 button to start conversion. Just for a while, the conversion would finish and be enjoyed freely.
Now download this video to 3gp converter for mac here.

Create a Windows XP Bootable CD by N-lite!!! - Very easy

I think many users already know about it.But it's the easiest process of making windows XP bootable cd from Windows XP files.So here we go:

Tools we need:
1.N-lite(Search Google)
2.A folder having Windows XP files.
3.A Blank CD.
4.A CD/DVD RW Drive
5.Some common sense.

Process:
1.Download N-lite and install it.
2.Open N-lite and on the welcome screen click on next.
3.Now in the second windows,browse your folder with the Windows XP files.It will show you information about your OS.
4.After that click next.
5.Click next again.(On the Presets windows)
6.Then you will see many options.Just click on Bootable iso, if you wanna save or direct burn the image created by the n-lite.There are many other options,but they are for professionals or custom OS creators.
7.Click on Next.Then this window will pop-up.
here from the very first option.select what you want.Select Direct Burn if you want a direct burn to CD.Select Create image if you wanna create and save the image for burning later.
Type any Label in the Label option.
8.Click on Make ISo.
9.Click on Next.
Done!!!

Congratulations! You have created your own Windows XP installation CD with the non-bootable WIndows Xp files.
Regards!!

Note:- The process is tested by me and all the screenshots are taken at my laptop.

By pressing a hotkey, you can turn off your monitor

Monitors, including desktop and laptop LCDs, consume a considerable amount of power. Yet most of us leave ours on and running all day (if not all night).

Sure, you can configure Windows to turn off the display after a period of inactivity, but that's less than ideal: Either the delay is too short, meaning the monitor turns off when you don't want it to, or it's too long to do any good, efficiency-wise.

What I want is a way to quickly turn off the monitor when I get up from my desk and then turn it on again when I return.

Yeah, I know, it's called the Power button. But that doesn't help laptop users. And some monitors take awhile to restart after being powered off.

A British company called VeryPC just unveiled a utility called PecoBOO that combines your Webcam with facial-recognition technology: Whenever you turn away from or leave the computer, the software turns off the display. It turns it back on when your face reappears.

That's kind of cool, but it seems like overkill to me. All I really need is a hotkey that'll turn my display off without actually cutting the power. After all, there are hotkeys for standby and hibernate modes; why not for just the monitor?

Thankfully, there's a pretty easy way to set that up. All you need is a tiny, free command-line utility called NirCmd, and the simple instructions provided by the How-To Geek.

In a nutshell, you'll extract NirCmd to a folder on your hard drive (I used C:\Nircmd for simplicity's sake), create a shortcut to it, assign a hotkey of your choice to that shortcut, and then, if you want, pick a nice-looking icon to go with it.

Works like a charm. Now, whenever I press Ctrl-Shift-M, my monitor goes dark. A tap of any other key wakes it up again. The only challenge I face is remembering to do this every time I get up from my chair--but I trained myself to use other hotkeys, so this should be a breeze.

Think of the energy we could save if everybody used this tip!

Source: PC World

Best tips for convert DVD to FLV


Leawo DVD to FLV Converter is a small and easy tool to convert DVD to FLV, including MOV, 3GP, 3G2, MP4 with H.264. This converter can not only rip DVD to FLV, but it offers many edit functions to trim the video. This enables you to trim a video clip even a short duration from the whole Video_TS, Titles, and Chapters. This DVD to FLV Converter can also help to crop the video to the aspect ratio you want. Generally,you can crop the video from 16:9(wide screen) to 4:3 or vise versa.Plus, this DVD to FLV Converter can also convert DVD to MP3 for playingon PMPs, web, etc.

The converter is fast in conversionas it supports to convert DVD to FLV in batch mode. A wide range of parameters are available to set for the video quality as well.
Now, let's see how to use Leawo DVD to FLV Converter to rip DVD to FLV easily.

Step 1
Download and Install Leawo DVD to FLV Converter

Step 2
Insert the DVD disk into the DVD drive, open the program and import the DVD files.


Step 3
Do the settings:
1. In Subtitle, select the subtitle language.
2. In Audio, select the language of the audio.
3. In Profile, select FLV Video.
4. In Output, set your destination folder for the output file.

Step 4
Click "Customize" to customize the video in your desire. (The functions under the "Customize" item are only available in Pro version!)


a. Effect adjustment:
Drag the slides for Brightness, Contrast, and Volume to improve the video quality.
b. Drag the buttons on the slide to trim the video or change the values directly in the Start Time and End Time
c. Choose
a selection from "Letter Box" to crop the video, or directly drag the dot frame for it. Click "OK" to confirm the settings.

Step 5
Click the big button to start the conversion.

Join 001 or __a files with File SJ?

Hi. you usualy see file with extension is: 001, 002, 003, ... (or __a, __b, __c, ...). I with guide for you how to join it.

You need download this software: File SJ 2.9. This is portable freeware. Support 2 language: English & Vietnamese.

Open Files SJ and start now:

Step 01: Choise joining tab:
Step 02: Select input file by click to Button in picture.


Step 03: select file have extention is 001 or __a, and click Open


Step 04: click Join Button to start. You can see joining is process. Wait for complete. You will get file joined. You can play it now.


Tips by CtrlzBoy

System monitoring with Conky

My number one favorite system monitor used to be Gkrellm, a small GUI tool that displays system information such as CPU usage, memory and hard drive usage, network throughput, and so forth. Recently, I discovered Conky, which is another system monitoring tool that works extremely well. One of the nice advantages to Conky is that it can operate in a window-less mode, so it persistently anchors to the desktop, preventing it from being moved or closed.

On many distributions, it’s a yum or apt-get away; on Fedora 11, you would simply execute the following to install it:

# yum install conky


Once installed, copy the default configuration file (usually /etc/conky/conky.conf) to ~/.conkyrc so you may begin to customize it to suit your tastes and display the information you choose.
By default it displays the uptime, system CPU operating frequency, the number of running processes, the usage for RAM, swap, and CPU, hard drive space used, networking throughput, and the top four CPU-consuming processes.
A few nice tweaks to the defaults include setting the following options in ~/.conkyrc:

double_buffer yes
own_window_transparent yes
xftfont DejaVu Sans Mono:size=10
The first is useful if you experience window flickering in Conky as it refreshes status information; usually setting double_buffer will correct this issue. The second makes Conky transparent, so it looks as though the statistics are part of the desktop itself. Finally, changing the xftfont string can provide different fonts and smaller font sizes (the default is to use a 12pt size; setting it to 10 makes it take up less room on the desktop and is still quite readable).
The configuration file has a lot that can be added to it, allowing you to monitor many parts of your system. It can monitor POP3/IMAP mail accounts, temperature, the number of connections on specified TCP ports, fan states, battery charge, and much more. The full variable listing of what Conky supports is available on the Web site. As an example, you can make Conky monitor the number of SSH connections to the system and to display the system load average like this:

${color yellow}Load Average:$color $loadavg
${color grey}SSH connections:$color ${tcp_portmon 22 22 count}
The first displays the “Load Average” text in yellow, and then displays the load average. The second displays the number of connections on port 22. The “count” option can be replaced with others, some of which are “rip” to display the remote IP address and “rhost” to display the remote hostname.
The configuration is quite versatile and there is a lot you can monitor with Conky. Having Conky run when you login as a startup item will have it constantly available on the desktop. It also is not bound to a virtual desktop, so it is available on all of them, and does not take up any room on the panel as an active process. Finally, any users of GeekTool on OS X will find that the feel of Conky is quite similar to that versatile tool.

Watch that Excel search feature

Excel’s search function, by default, searches only the current sheet, which could pose a problem if you use multiple sheets. Unfortunately, the feature’s not upfront about it either. For instance, the search for Aristotle in the following spreadsheet turns up one occurrence, in cell A14. What you can’t see is that Sheet 3 contains a duplicate book list (simply for the sake of this example). As you can see in the following figure, there’s no alert or warning that specifies which sheet Excel will consider in its search. You might assume it’s just the current sheet, or you might (incorrectly) assume that it’s searching all of the sheets. This behavior is something you just have to know about and accommodate.


Excel will find matches on multiple sheets, but you must first define the search group in one of three ways:

  • Hold down [Ctrl] to choose nonadjacent sheets. Then, click the tab of each sheet you want to search.
  • Hold down [Shift] and click the first and last sheets in an adjacent group of sheets to select the clicked sheets and all those between.
  • Select all sheets in the workbook by right-clicking any sheet tab and selecting Select All Sheets from the resulting shortcut menu.

Once you’ve created a group, Excel will display [Group] in the title bar. To ungroup sheets, click any unselected sheet or right-click a sheet tab and select Ungroup Sheets from the resulting shortcut menu.

When you run a search from a grouped sheet, Excel searches all the sheets in the group, not just the current sheet.

How to Burn .ISO Files to DVD Discs on Mac OS X (including Snow Leopard)?

When you have several .ISO files you have either downloaded from the Internet or saved as .iso files on your hard disk, and you want to burn them to DVD Discs to play on DVD Player, the following guide is going to show you how to burn .ISO files to sorts of DVD discs such as DVD-R, DVD+R, DVD-RW, DVD+RW, DVD+R DL, DVD-R DL, DVD-RAM on Mac OS X, especially on Snow Leopard.

1. What is ISO File?

ISO is a disk image defined by the International Organization for Standardization. ISO image files typically have a file extension of ISO. The name ISO is taken from the ISO 9660 file system used with CD-ROM media, but an ISO image can also contain UDF file system because UDF is backward-compatible with ISO 9660. An ISO file contains the image of a disk, meaning that it contains every file and folder that the disk had.

2. How to Burn ISO Image Files to DVD on Mac OS X?

To burn ISO image files to sorts of discs(burn iso to dvd-r, burn iso to dvd+r, burn iso to dvd-rw, burn iso to dvd+rw, etc.) on Mac, you can use ISO to DVD Burner for Mac, which is a professional iso burner tool to burn iso image files to dvd on mac os x, especially on Snow Leopard.

You can Free Download ISO to DVD Burner here: http://www.imediacreator.com/mac-dvd-creator-standard.html

Step1. Add ISO Files to the program
After installing and running the program, you need to choose “ISO” to import file, then it will remind you “Drag ISO movie image here to start”, also you can click "+" to add your ISO Files to the program. See the interface below:


Step2. Burn ISO File to DVD Disc
Now you can start to burn ISO file to DVD Disc on Mac now, also you can see there are 2 methods you can choose to output: D5 and D9. Usually we choose D9 Disc to Burn.

3. Tips: How to Choose DVD Disc to Output your DVD File?

There are 4 different DVD Disc now in market. D9 and D5 is the most common Disc to save Video movies. And the size of them can be a little bit confusing for users. There are basically 4 different DVD Sizes.

DVD-5 (Single Side Single Layer)
D5 holds around 4 700 000 000 bytes and that is 4.37 computer GB where 1 kbyte is 1024 bytes* . DVD+R/DVD+RW and DVD-R/DVD-RW support this format. This is the most common DVD Media, often called 4.7 GB Media. A DVD-5 disc will hold nominally 133 minutes of high quality MPEG-2 encoded video, together with three surround-sound audio channels and four subtitle channels. (Without video compression one DVD-5 disc would hold only about 3 minutes of video).

DVD-10 (Dual Side Single Layer)
D10 holds around 9 400 000 000 bytes and that is 8.75 computer GB. DVD+R/DVD+RW and DVD-R/DVD-RW support this format. A DVD-10 disc will hold a nominal 133 minutes on each side (ie 266 minutes in all), but the disc needs to be turned over to play the other side.

DVD-9, (Single Side Dual Layer)
D9 holds around 8 540 000 000 bytes and that is 7.95 computer GB. DVD+R support this format. This media is called DVD+R9, DVD+R DL or 8.5 GB Media. A DVD-9 (dual layer) disc and hold 240 minutes of continuous video.

DVD-18, ( Dula side Dual Layer )
D18 holds around 17 080 000 000 bytes and that is 15.9 computer GB. DVD+R supports this format. DVD -18 can hold 240 minutes on each side and the disc needs to be turned over to play the other side.

DVD+R/DVD+RW/DVD+R DL and DVD-R/DVD-RW exact sizes
DVD-R/DVD-RW = 4 706 074 624 bytes ( 4488 MB )
DVD+R/DVD+RW = 4 700 372 992 bytes ( 4482 MB )
DVD+R DL = 8 547 993 600 bytes ( 8152 MB )

ISO to DVD Burner now can support to burn ISO image to DVD 5, Burn ISO to DVD 9, Burn ISO to DVD-R, Burn ISO to DVD+ R, you can choose the DVD Disc which you want to burn, with simple and practical edit functions!

Transfer and copy Call list from iPhone to computer with iPhone Tool Kits?

Do you want to copy Call list from iPhone to computer for printting? iPhone Tool Kits is an easy to use utility designed to help you back up all your files on your iPhone, so that you can recover any lost or missing songs, videos, books, photos and so on. It can easily backup and transfer iPhone songs, videos, photos, SMS, call list, contacts and books(you purchased via iBook Store) to computer. And even enable your iPhone as a removable hard disk. It supports iPad, iPod touch as well. You can Free download it now.

How to transfer and copy Call list from iPhone to computer with iPhone Tool Kits?

Step 1: Connect your iPhone to your PC. Normally, iTunes will be auto-run first. In iTunes, make sure that "Enable disk use" has been checked in the iphone Options.


Step 2: Run our program. It will auto-scan the iPad on your PC. If the iPad is enabled, the files (iBooks) will be shown in the list.


Button Function description
1 To copy call list to your pc.
2 Status currently.
3 Quickly find items.


Step 3: From this list, you can now select and checkmark the files you want to back up. Click the "Export" button.

Step 4: Done! The files are now backed up to your computer.


Options setting

Convert mxf file on mac with MXF File Converter Mac

MXF video file is a "container" or "wrapper" format which supports a number of different streams of coded "essence", encoded with any of a variety of codecs, together with a metadata wrapper which describes the material contained within the MXF file.

STEPS by STEPS:

Step 1: Add mxf video files

Free download, install and run AVCHD Converter for Mac, then click "Add File" button to select your desired format that need to be converted from the "file type" list in the pop-up window.


Step 2: Choose output format

Choose the file, click "Profile" drop-down button to choose the format you need, then click "Browse" button to choose destination folder for saving output files.


Tip:
Trim: You will be able to select a certain length of video/audio in the clip to convert, so that you can get whatever part you want and won't be limited to convert the whole clip.
Crop: If you find the black sides and subtitle in the frame annoying, you can remove them using Crop.
Effecf: You can set Brightness, Contrast and Saturation to tune the rendering effect. Or you can go to Special effect to choose Old Film, Horizontal, vertical, etc. simple fun and interesting.

Step 3: Convert

When you get ready to convert the added mxf videos on Mac, Click the "Convert" button to start conversion and then you can just go out for a walk or take a nap, and the conversion may have been finished when you come back.


4Easysoft M2TS Converter - Total Solution for Converting Videos

M2TS Converter can help you convert M2TS files to MKV, AVI, WMV, MP4 and more; convert TS, MTS, TS, MOD, TOD, MOV, FLV, WMV, HD MP4, etc; added audio converter and audio extractor and edit your videos - Merge, Effect, Trim, Crop and Snapshot

Preparation: Download and install 4Easysoft M2TS Converter

Step 1: Add files

Click “Add File” button to load the video files that you want to convert.

Step 2: Set output settings
You can choose the output format from the profiles drop-down lsit.
You can set Encoder, Bitrate, Channels, Resolution and so on by clicking “setting” button.

Step 3: Start conversion.
Click “Start” to begin the conversion with high output quality and converting speed.


Editing Tips:
This converter also provides powerful editing functions, you can make video effect, trim video, crop video, select preferences, snapshot pictures, merge files into one.


How to watch DVD on iPod touch 3G?

It is great that Apple's new iPod Touch 3G can hold up to 80 hours video, but as we all know, DVD files cannot be played on iPod, because all the iPod devices do not support DVD format. You can only enjoy the high quality DVD movie under the premise of owning a DVD player. But if you want to watch the DVD movies on portable devices like iPod touch, you need an application which enables you to convert DVD to video formats, for example, mp4, mov, m4v etc.


In fact, there are dozens of third party solutions that will enable you to convert DVD to iPod. Some of them can work perfectly, while some may not. After trial experiences, I may introduce a powerful DVD to iPod Ripper for you.

Wondershare DVD to iPod Ripper is an efficient application which will fulfill all your desire and requirements with its excellent performance - super quick conversion duration and excellent audio/video quality. You can enjoy the high quality movies in your iPod as if you were watching in DVD Player.

Key feature:
1. Convert/rip DVD movies to iPod supported video formats (MPEG-4/MP4)
2. Optimize DVD video to iPod supported video resolution, perfectly fit your iPod screen
3. Extract music from DVD to iPod MP3, M4A and AAC
4. Edit DVD video (like trim, crop, add watermark and more)
5. Convert DVD to iPod Touch 3G and Convert DVD to iPod Nano 5G with camera
6. Support all iPod models (including iPod OS 3.1)
7. Support Windows 7

Here is the step by step tutorial showing you how to transfer DVD movie to Apple iPod Touch, of course iPod Classic serial and Nano serial are also compatible.

Please download Wondershare DVD to iPod Touch Converter, install and launch it. And follow the steps below you will convert your favorite DVD movies to iPod Touch MP4 video with only 3 steps.


Step 1: Add DVD movies
Click "Add" you can load DVD files from DVD Rom/Folder(data DVD)/IFO/ISO files respectively.

Step 2: Select MP4 as output formats
Then you can select MP4 as output formats from the categorized output formats listed in "Profile" drop-down list. This iPod Touch DVD Ripper also allows you to convert DVD to iPod Classic/video/shuffle/nano. You can select the corresponding format.

Step 3: Start conversion
After selecting the output format, you can start conversion by clicking "Start" button, and all the tasks will be done at high speed and fabulous quality.

Tip: You can check the option to select "shut down computer when conversion completed".

The whole process is as easy as ABC, and then you can transfer the video file to your new iPod Shuffle. Hope you enjoy it.

Convert DVD to Zune with Leawo DVD to Zune Converter

Leawo DVD to Zune converter can rip DVD movie and convert DVD to Zune. It is very easy to use and works great. You just need to convert DVD to WMV or MP4 video, then add it to your Zune library and sync it to your Zune, that's all. In addition to the primary function to convert DVD to Zune, it is with more edit functions as batch conversion mode, merge all the files into one, and the output file customization and so on. Then you are able to watch the DVD on your Zune, but with a much better visual effect in your style.
This DVD to Zune Converter offers perfect sync of picture and sound, best output quality ever.

Let's see how to convert DVD to Zune with Leawo DVD to Zune Converter at ease.
Insert the DVD disk into the DVD drive, open the program and import the DVD files.


Do the settings:
1. In Subtitle, select the subtitle language.
2. In Audio, select the language of the audio.
3. In Profile, select WMV or MP4 Video.
4. In Output, set your destination folder for the output file.


Click “Customize” to customize the video in your desire. (The functions under the “Customize” item are only available in Pro version!)

a. Effect adjustment:
Drag the slides for Brightness, Contrast, and Volume to improve the video quality.


b. Drag the buttons on the slide to trim the video or change the values directly in the Start Time and End Time.


c. Choose a selection from “Letter Box” to crop the video, or directly drag the dot frame for it. Click “OK” to confirm the settings.


d. Browse for an image file, set its transparence, position and size to create a logo watermark. Click “OK” to confirm the settings.

e. Enter a text, click the "T" button to change font properties, set its transparence and position to create a text watermark. Click “OK” to confirm the settings.

Click the big button to start the conversion.

Transfer songs videos playlists from iPod to iPhone easily

Step 1: Free download this iPod to iPhone transfer and run it.

Step 2: Launch this iPod to iPhone transfer. The interface is as follows:

Transfer songs videos playlists from iPod to iPhone

Step 3: Connect two iPods to your computer. Then your iPods' information will be displayed:

Transfer songs videos playlists from iPod to iPhone

Note: The two windows will display the same iPod's info. Just click the other tab:

Transfer songs videos playlists from iPod to iPhone

Transfer songs videos playlists from iPod to iPhone

Step 4: Creat a playlist on one iPod (you want to transfer songs to):

Click playlist button:

Transfer songs videos playlists from iPod to iPhone

Then double-click Add New Playlist:

Transfer songs videos playlists from iPod to iPhone

Transfer songs videos playlists from iPod to iPhone

The added playlist will be displayed:

Transfer songs videos playlists from iPod to iPhone

Step 5: Highlight the file(s) you'd like to transfer to the new playlist::

Transfer songs videos playlists from iPod to iPhone

Step 6: Click <- arrow to transfer selected files to the new created playlist:

Transfer songs videos playlists from iPod to iPhone

Then the file counts will change to 1:

Transfer songs videos playlists from iPod to iPhone

Done! Now you have successfully transfered songs/videos/palylists from iPod to iPhone. Enjoy the music from other iPod on your iPhone right now!